Configuration: Event
This configures the way the system handles various surveillance actions.
The ClareVision NVR only processes normal events, but it supports smart events and AI events processed by an attached camera.
Normal Event
Smart Event
Normal Event
This page handles non-AI events processed by the NVR.
Motion tab
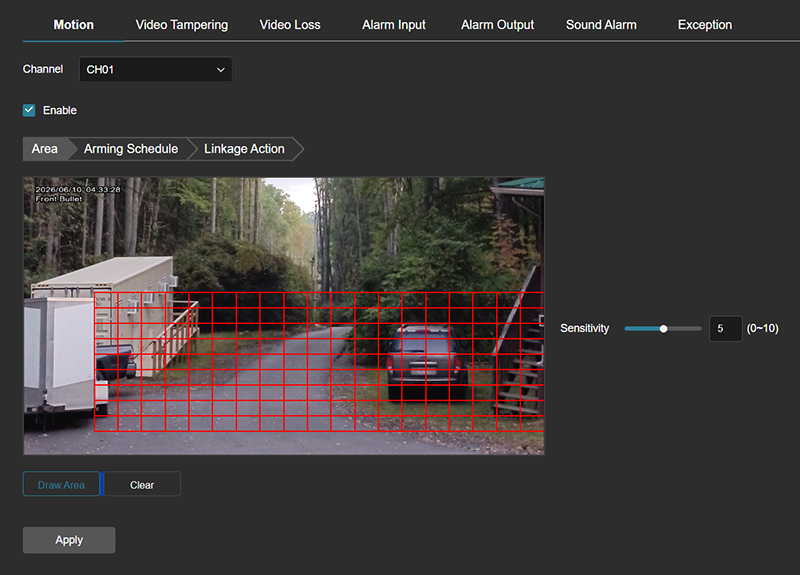
This looks for large changes in the camera's stream. At the top, select the channel to configure, and select Enable.
Area
The red grid displays where the system checks for movement. Click Draw Area to edit the area. When editing, click and drag in the image to toggle zone inclusion and exclusion. Sensitivity determines how much of a change the system watches for; higher sensitivity means smaller changes trigger an alert.
Arming Schedule
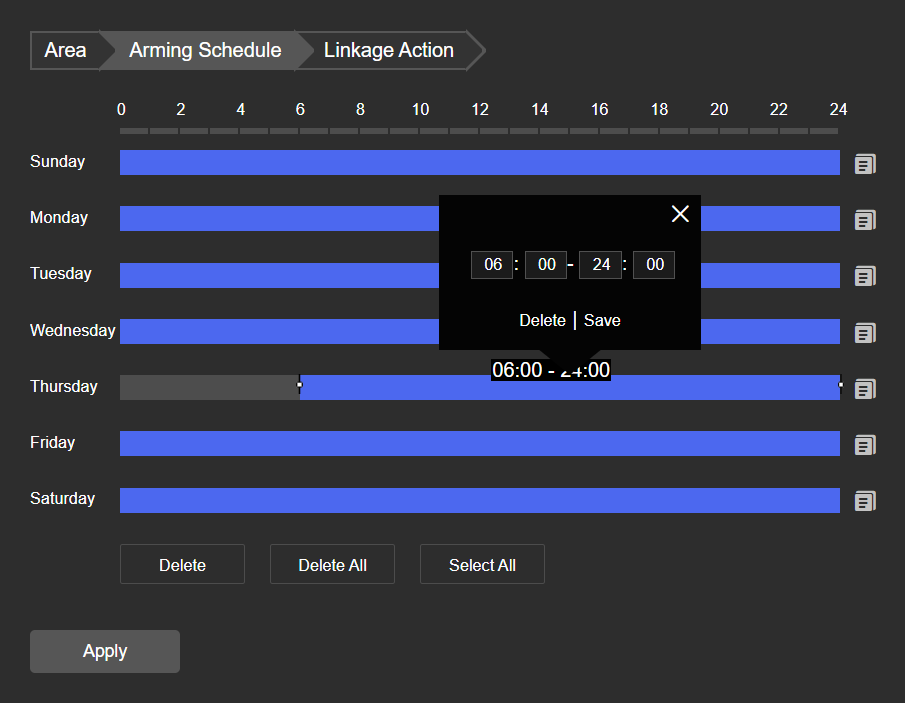
Blue bars show when the channel has motion detection active; gray is inactive.
-
Click and drag in a gray area to add a new active section.
-
Click on a blue bar to open its data; enter the start and end times manually in the popup, or drag the dots at the ends of the bar to adjust.
-
Click the
 icon to copy that day's schedule to other days.
Linkage Action
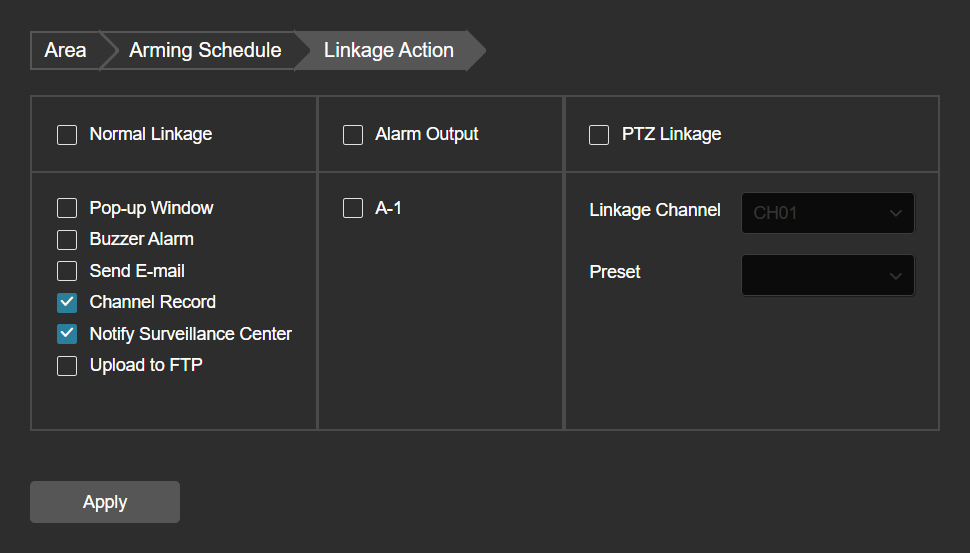
This configures which actions an alert triggers.
-
Normal Linkage
-
Pop-up Window: Opens a dialog window on the interface to attract attention.
-
Buzzer Alarm: The NVR beeps. This is a local alert only.
-
Send E-mail: Sends a notification to the recipients configured here.
-
Channel Record: Starts recording the camera that logged the event.
-
Notify Surveillance Center:
-
Upload to FTP: Sends the surveillance files to the site configured here.
-
-
Alarm Output: Enable this to trigger a local alarm from the camera. Then enable the alarm output(s) to use.
-
PTZ Linkage
-
Linkage Channel: Select which PTZ camera to activate.
-
Preset: Select the preset that focuses on the area.
-
Video Tampering tab
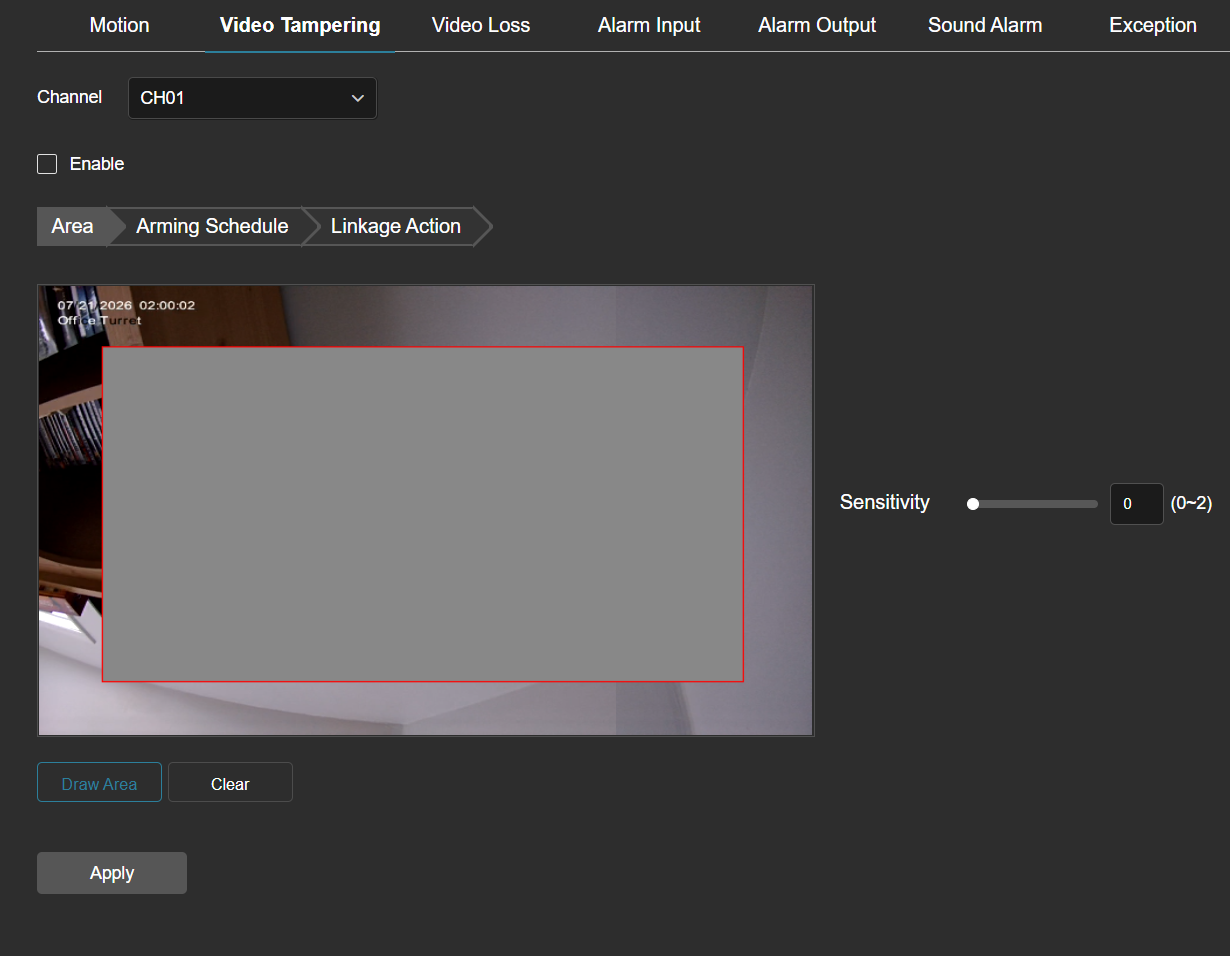
This looks for evidence of sabotage to the camera itself.
Area
You can draw one area to check for tampering. Click Draw Area to add a square to check, and Clear to remove any area drawn.
The area is bordered red if it was drawn in this session, and yellow if an area has been saved before you clicked on this tab. If the border is red, you can click and drag one of the sides of the area to reshape the box. Click Apply to save your changes (the border does not change color, and you can still adjust it until you leave the Video Tampering tab).
Sensitivity determines how much change is allowed before an alert is raised.
Arming Schedule
Blue bars show when the channel has motion detection active; gray is inactive.
-
Click and drag in a gray area to add a new active section.
-
Click on a blue bar to open its data; enter the start and end times manually in the popup, or drag the dots at the ends of the bar to adjust.
-
Click the
icon to copy that day's schedule to other days.
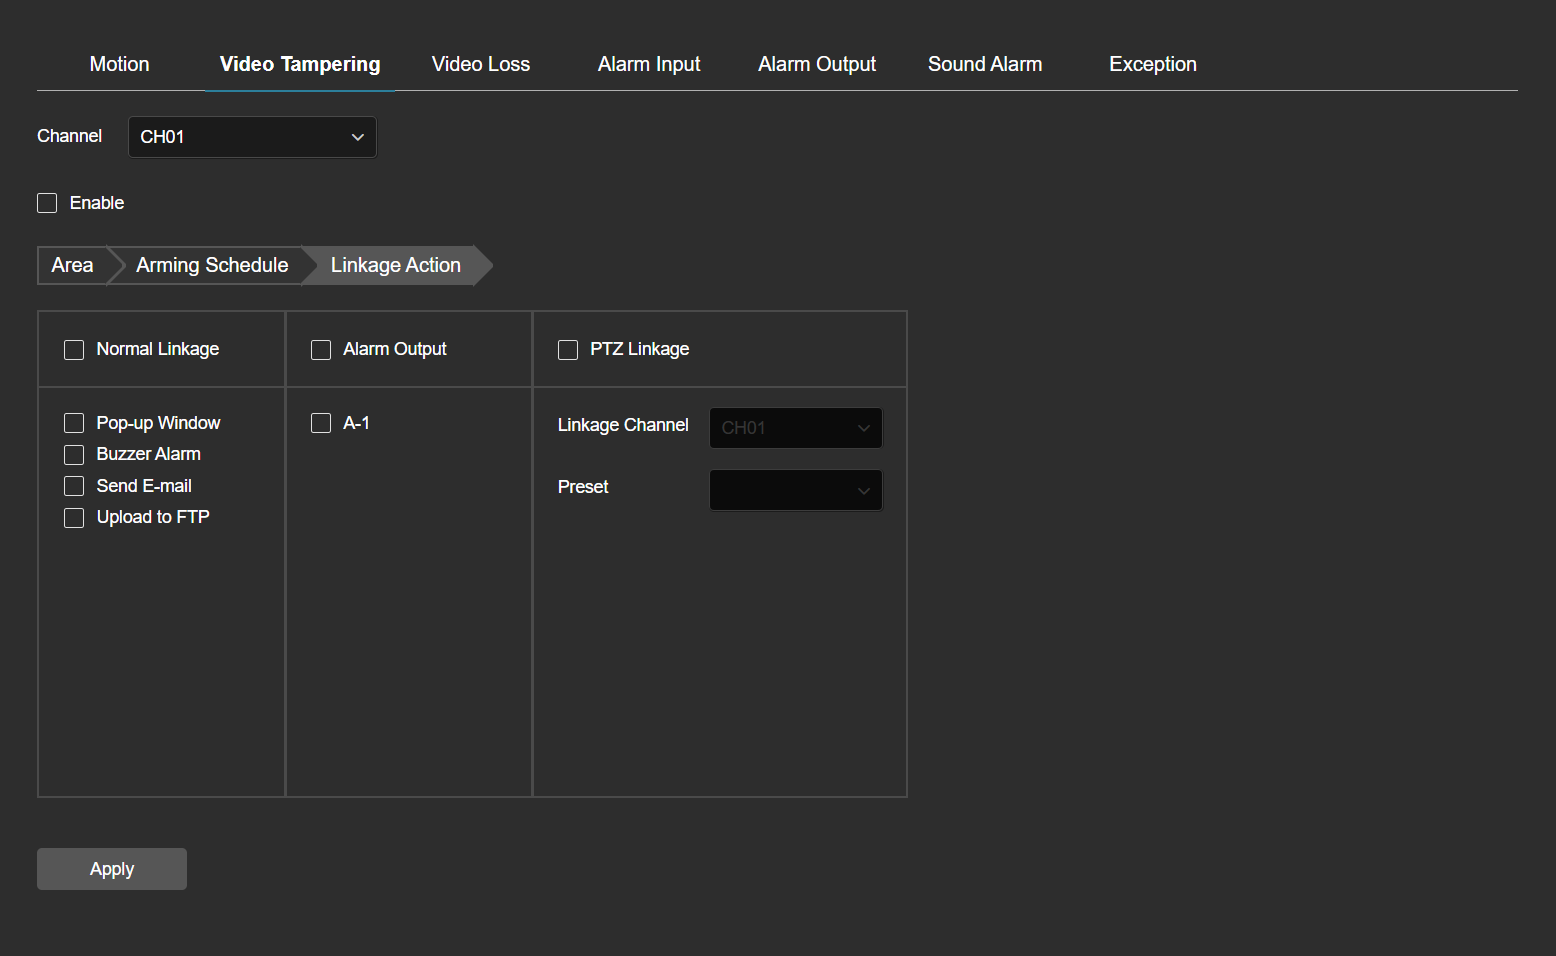
Linkage Action
This configures which actions an alert triggers.
-
Normal Linkage
-
Alarm Output: Enable this to trigger a local alarm from the camera. Then enable the alarm output(s) to use.
-
PTZ Linkage
-
Linkage Channel: Select which PTZ camera to activate.
-
Preset: Select the preset that focuses on the area.
-
Video Loss tab
This checks for a camera feed dropping entirely.
Arming Schedule
Blue bars show when the channel has motion detection active; gray is inactive.
-
Click and drag in a gray area to add a new active section.
-
Click on a blue bar to open its data; enter the start and end times manually in the popup, or drag the dots at the ends of the bar to adjust.
-
Click the
icon to copy that day's schedule to other days.
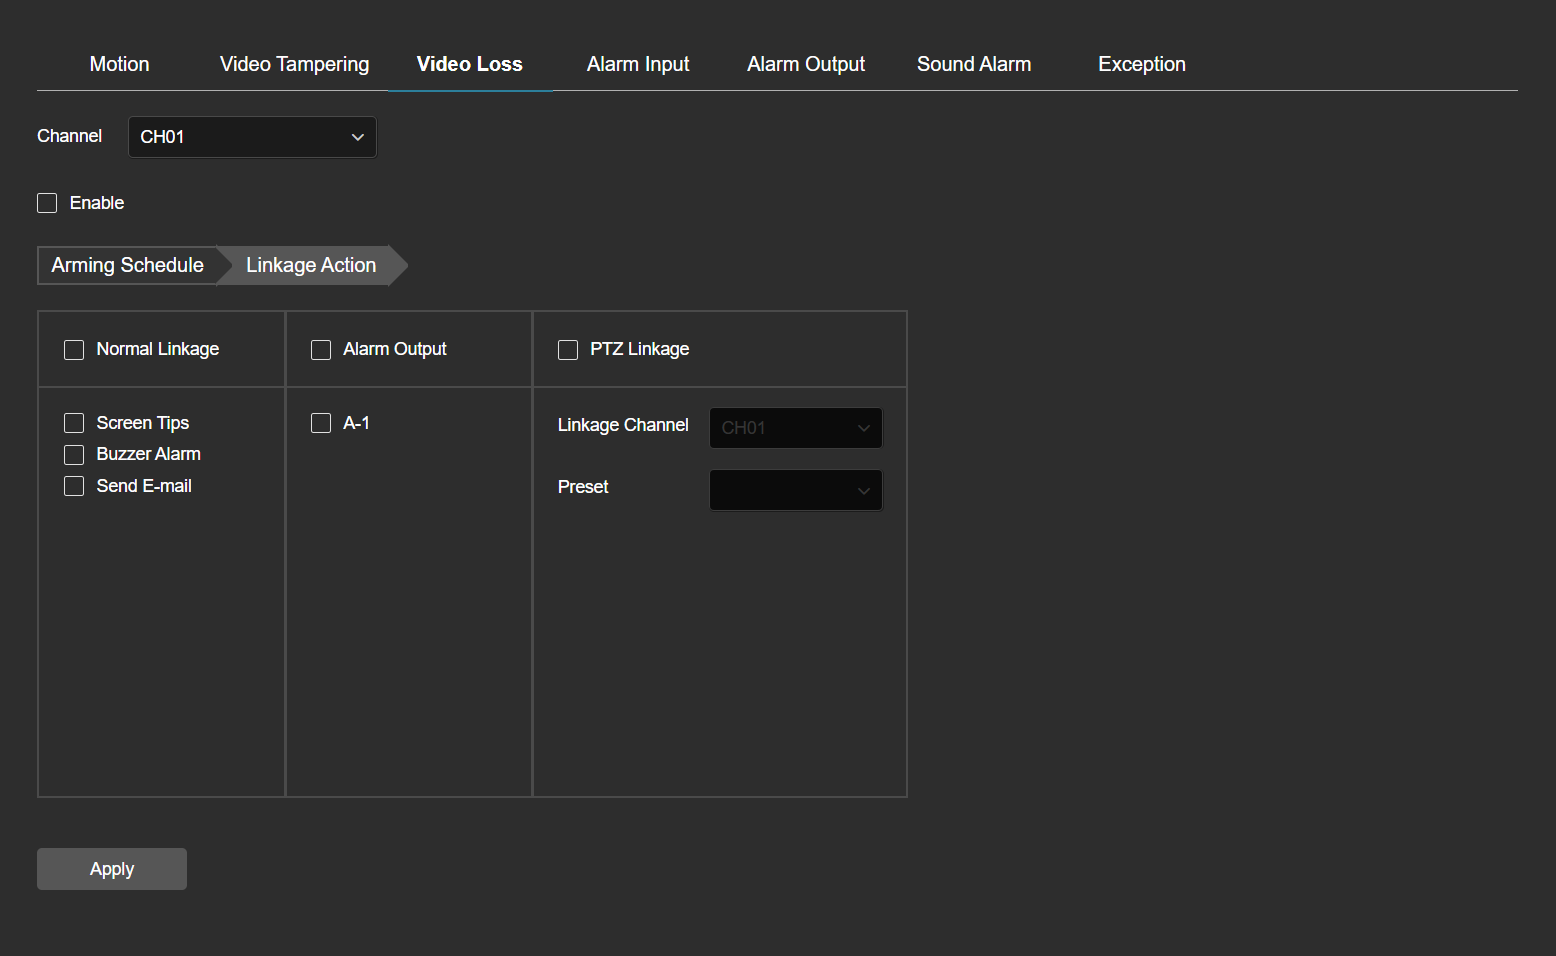
Linkage Action
This configures which actions an alert triggers.
-
Normal Linkage
-
Screen Tips:
-
Buzzer Alarm: The NVR beeps. This is a local alert only.
-
Send E-mail: Sends a notification to the recipients configured here.
-
-
Alarm Output: Enable this to trigger a local alarm from the camera. Then enable the alarm output(s) to use.
-
PTZ Linkage
-
Linkage Channel: Select which PTZ camera to activate.
-
Preset: Select the preset that focuses on the area.
-
Alarm Input tab
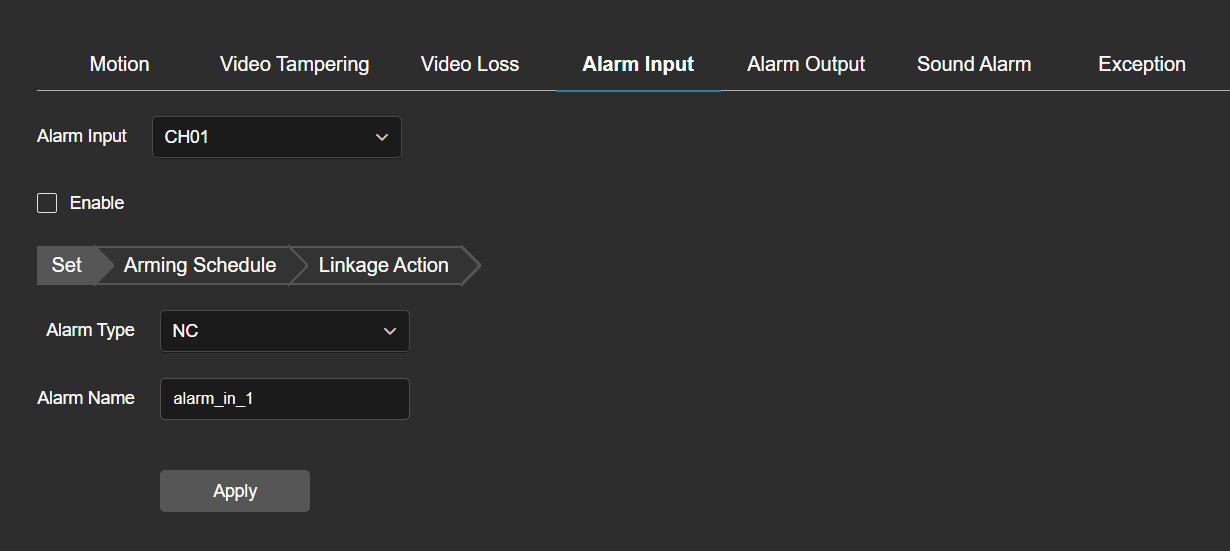
This configures how the system reacts when an alarm is sent by an external source.
Set
You can draw one area to check for tampering. Click Draw Area to add a square to check, and Clear to remove any area drawn.
The area is bordered red if it was drawn in this session, and yellow if an area has been saved before you clicked on this tab. If the border is red, you can click and drag one of the sides of the area to reshape the box. Click Apply to save your changes (the border does not change color, and you can still adjust it until you leave the Video Tampering tab).
Sensitivity determines how much change is allowed before an alert is raised.
Arming Schedule
Blue bars show when the channel has motion detection active; gray is inactive.
-
Click and drag in a gray area to add a new active section.
-
Click on a blue bar to open its data; enter the start and end times manually in the popup, or drag the dots at the ends of the bar to adjust.
-
Click the
icon to copy that day's schedule to other days.
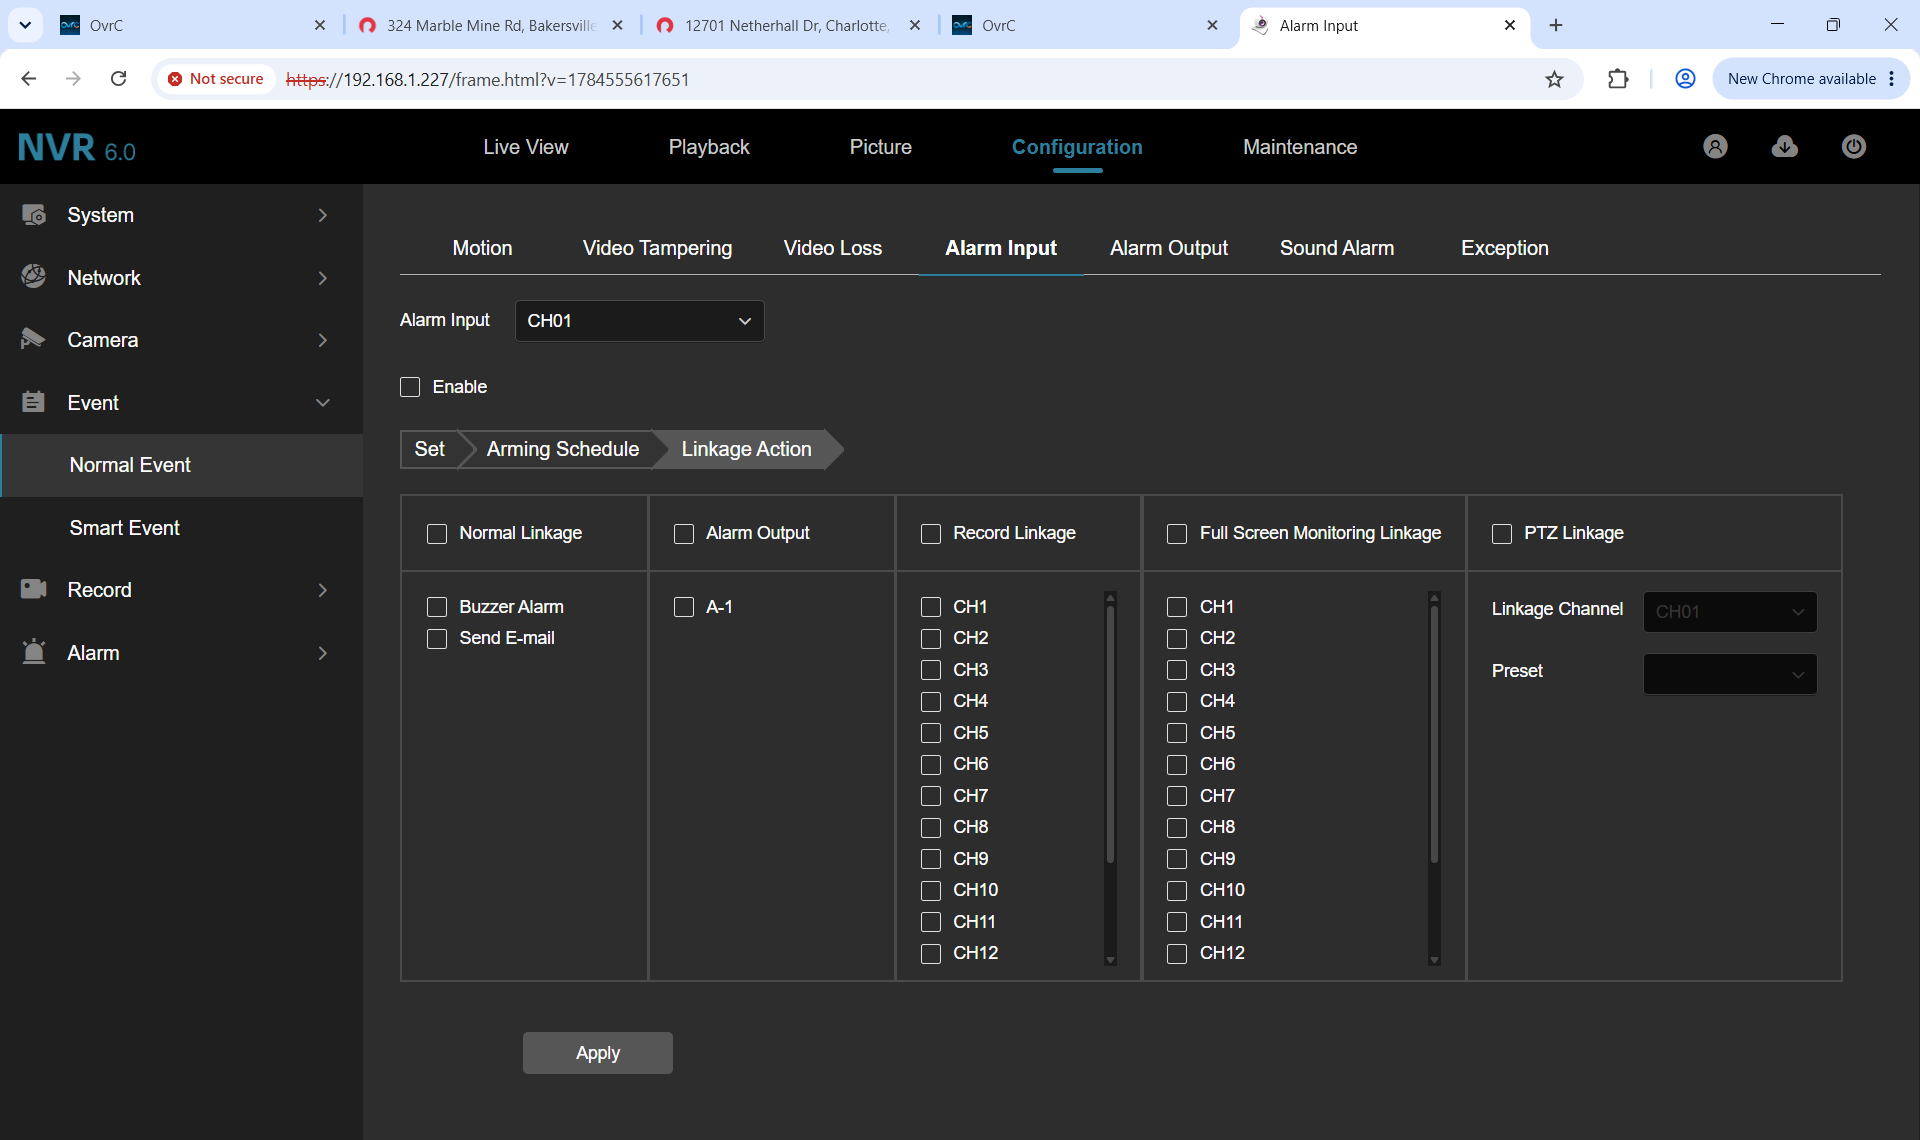
Linkage Action
This configures which actions an alert triggers.
-
Normal Linkage
-
Buzzer Alarm: The NVR beeps. This is a local alert only.
-
Send E-mail: Sends a notification to the recipients configured here.
-
-
Alarm Output: Enable this to trigger a local alarm from the camera. Then enable the alarm output(s) to use.
- Record Linkage: The alarm sets these channels to record.
- Full Screen Monitoring Linkage: These channels display in a fullscreen grid when the alarm triggers.
-
PTZ Linkage
-
Linkage Channel: Select which PTZ camera to activate.
-
Preset: Select the preset that focuses on the area.
-
Alarm Output tab
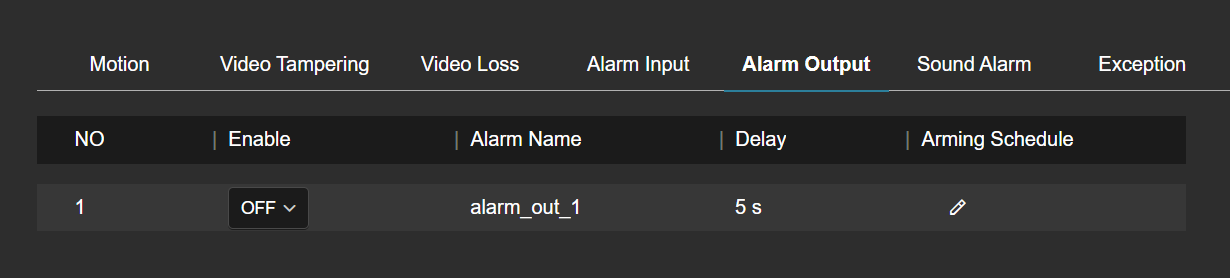
This lists all of the available alarms.
For each, choose whether to enable the alarm.
Click the pencil icon to edit the arming schedule for then an enabled alarm will be active.
Arming Schedule
Blue bars show when the channel has motion detection active; gray is inactive.
-
Click and drag in a gray area to add a new active section.
-
Click on a blue bar to open its data; enter the start and end times manually in the popup, or drag the dots at the ends of the bar to adjust.
-
Click the
icon to copy that day's schedule to other days.
Sound Alarm tab
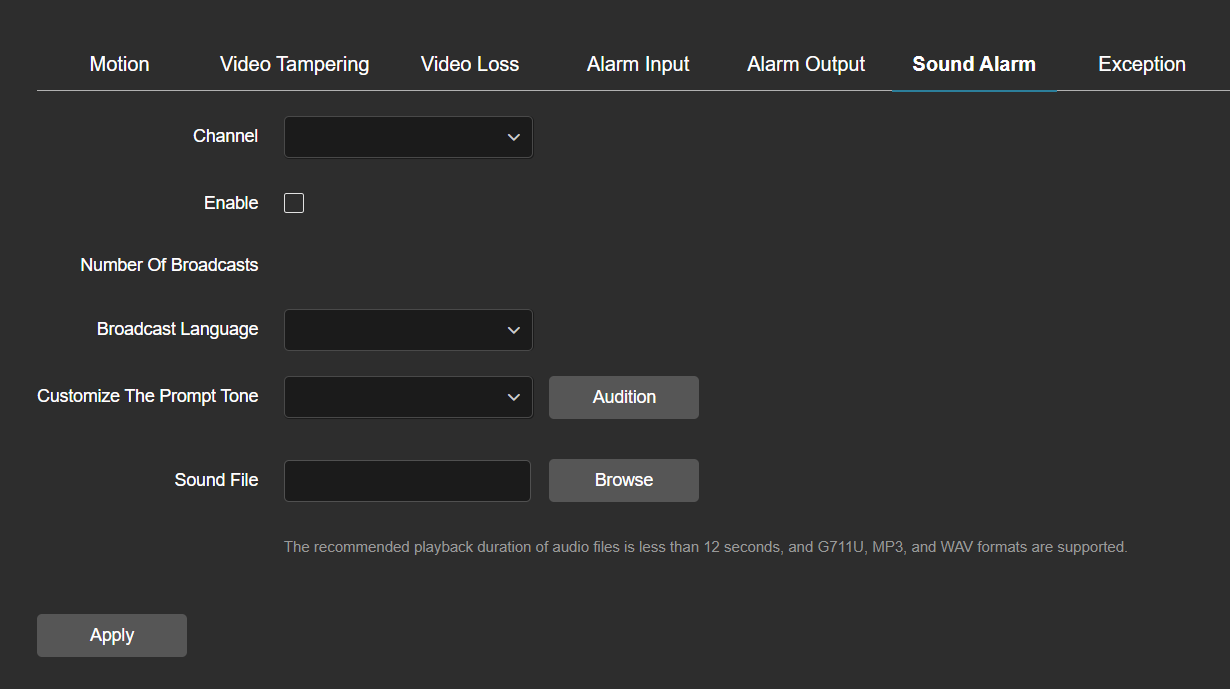
Here you set the audio alarm broadcast by the cameras.
Select the channel and click Enable.
Choose the warning file and the audio file to play for the alarm.
Exception tab
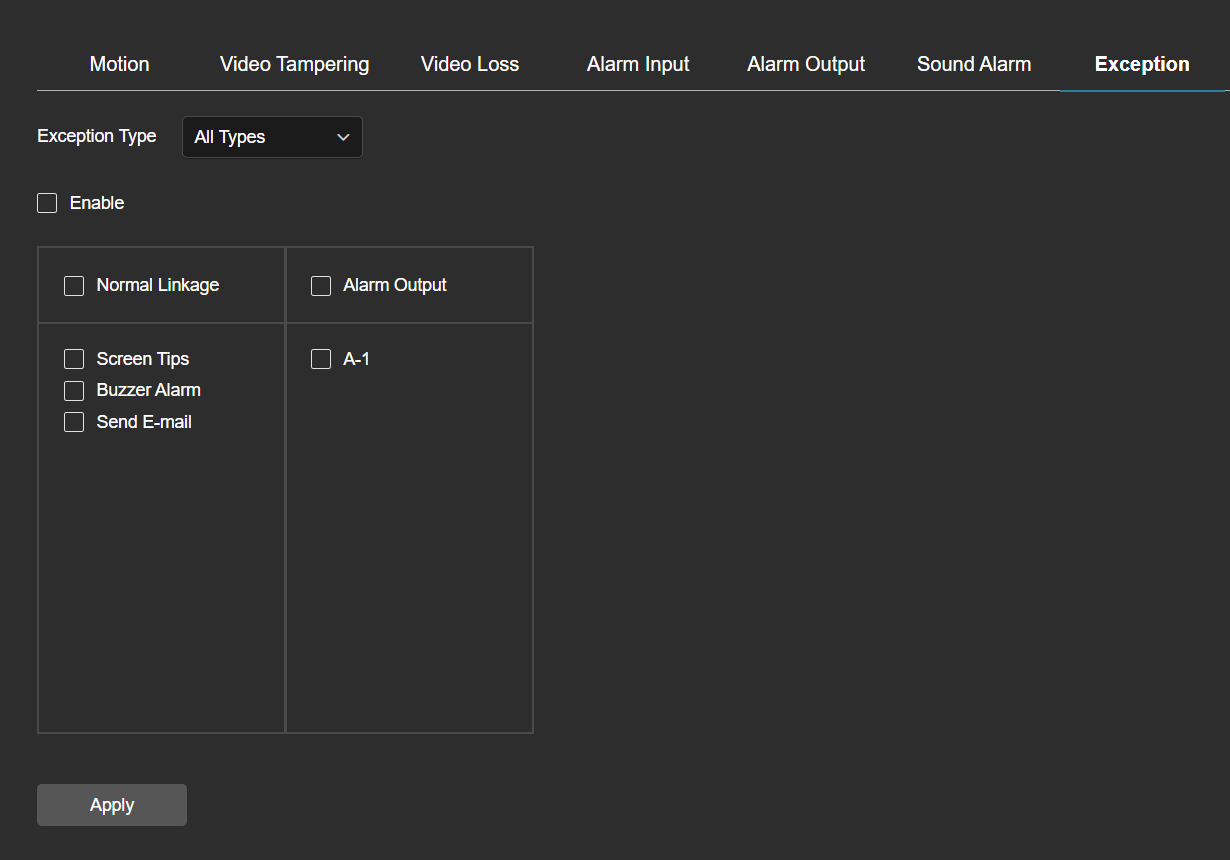
Here you set the system's response to issues not directly related to surveillance, like network errors, HDD errors, etc. At the top, select which exceptions you want to set, choose the linkage, and click Apply.
-
Normal Linkage
-
Screen Tips:
-
Buzzer Alarm: The NVR beeps. This is a local alert only.
-
Send E-mail: Sends a notification to the recipients configured here.
-
-
Alarm Output: Enable this to trigger a local alarm from the camera. Then enable the alarm output(s) to use.
Smart Event
This handles AI-assisted events activated by the cameras.
Intrusion
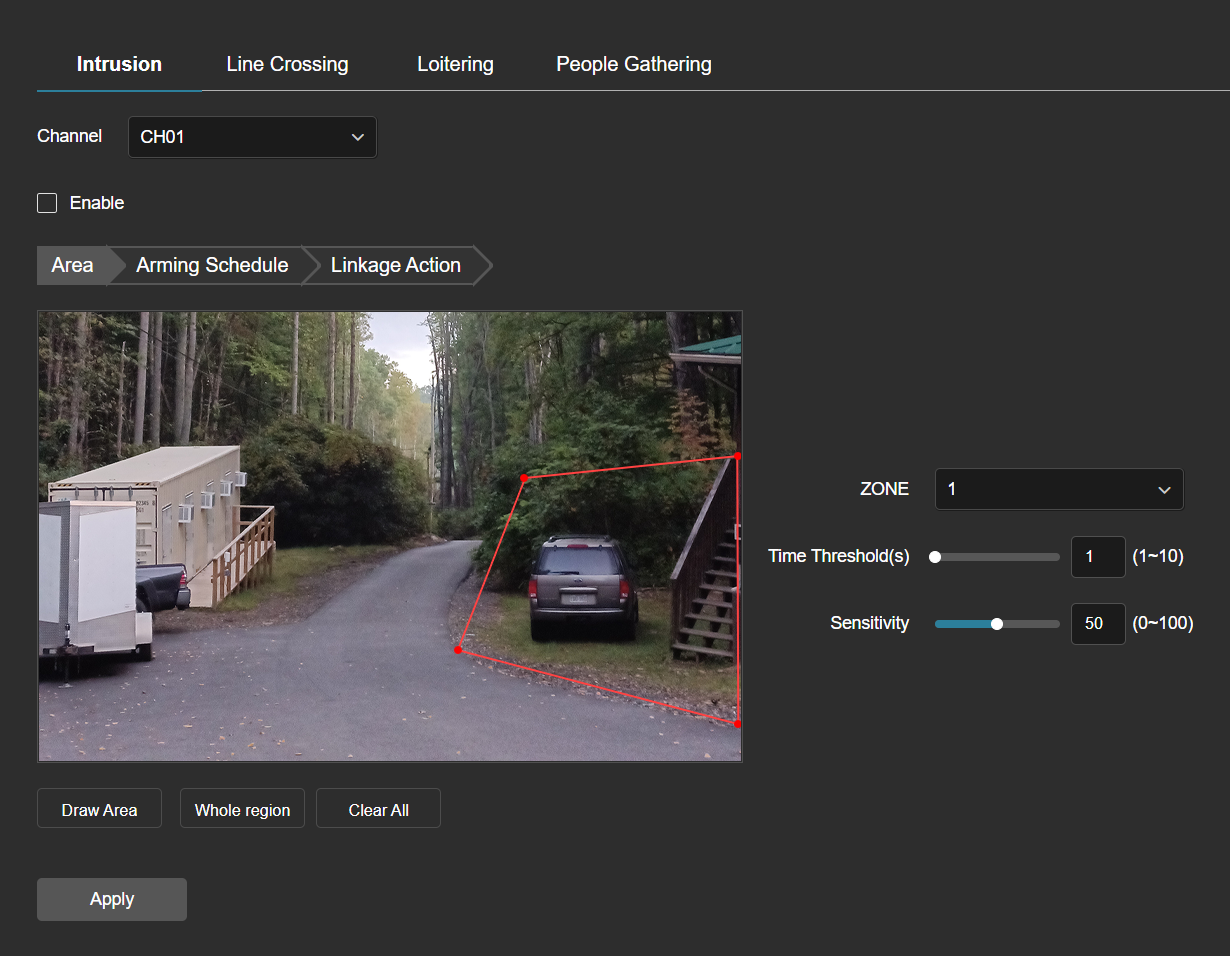
This looks for people moving into a designated area.
Area
To draw an area for analysis, select the zone to draw using the dropdown, then click Draw Area. Click four times in the image area to define a shape. Once it's drawn, you can click and drag in the center to move the shape, or click and drag a corner to adjust it. Whole region selects the entire sceeen, and Clear All removes all defined zones.
Set the threshold and sensitivity as needed.
Click Apply to save all changes.
Arming Schedule
Blue bars show when the channel has motion detection active; gray is inactive.
-
Click and drag in a gray area to add a new active section.
-
Click on a blue bar to open its data; enter the start and end times manually in the popup, or drag the dots at the ends of the bar to adjust.
-
Click the
icon to copy that day's schedule to other days.
Linkage Action
Line Crossing
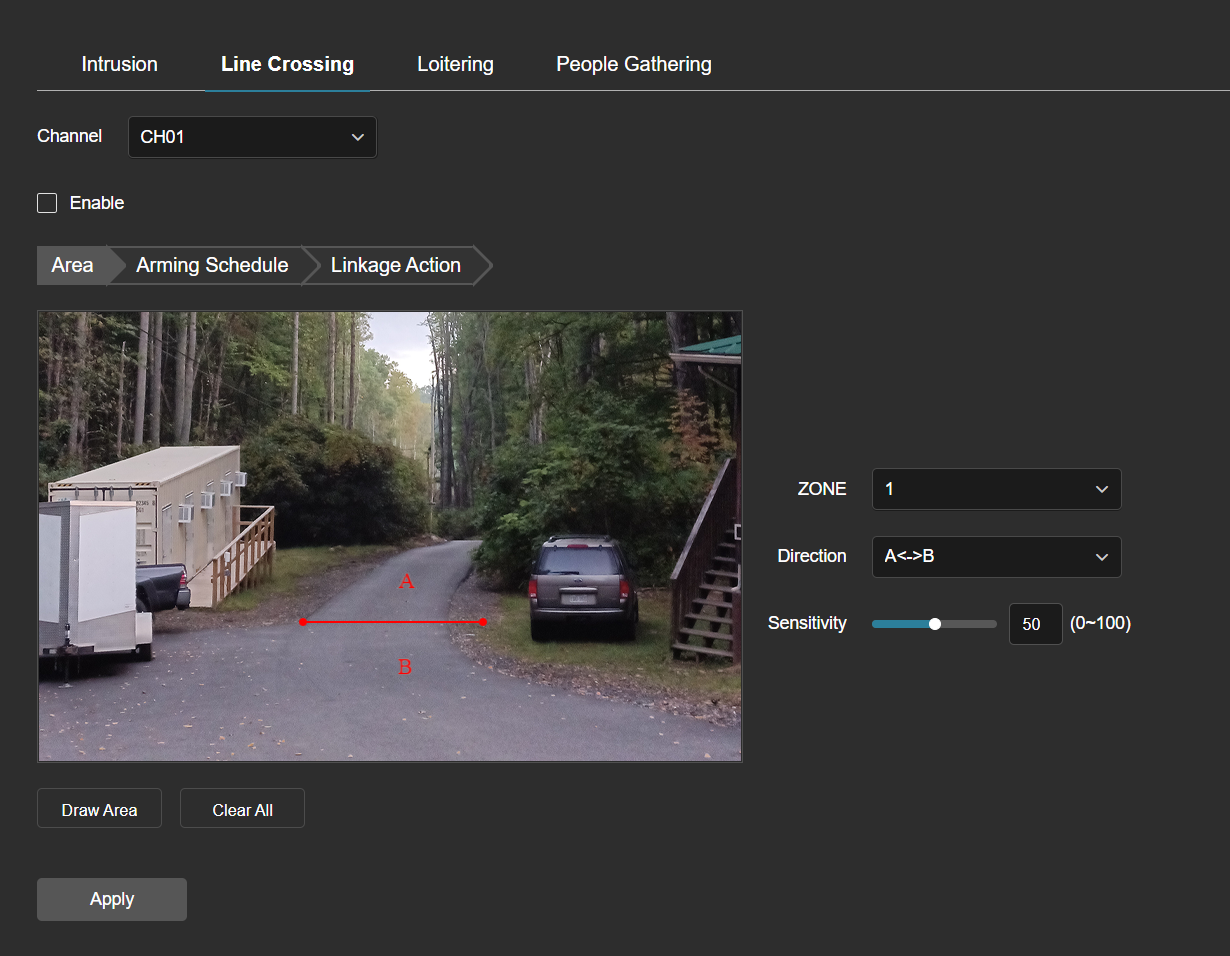
This looks for people crossing over a designated border.
Area
To draw line for analysis, select one to draw using the dropdown, then click Draw Area. Click twice in the image area to define a line. Once it's drawn, you can click and drag an endpoint to adjust it. Clear All removes all defined lines.
Set the direction and sensitivity as needed.
Click Apply to save all changes.
Arming Schedule
Blue bars show when the channel has motion detection active; gray is inactive.
-
Click and drag in a gray area to add a new active section.
-
Click on a blue bar to open its data; enter the start and end times manually in the popup, or drag the dots at the ends of the bar to adjust.
-
Click the
icon to copy that day's schedule to other days.
Linkage Action
This configures which actions an alert triggers.
-
Normal Linkage
-
Pop-up Window:
-
Buzzer Alarm:
-
Send E-mail:
-
Channel Record:
-
Notify Surveillance Center
-
Upload to FTP
-
-
Alarm Output: Enable this to trigger a local alarm from the camera. Then enable the alarm output(s) to use.
-
PTZ Linkage
-
Linkage Channel: Select which PTZ camera to activate.
-
Preset: Select the preset that focuses on the area.
-
XX
Loitering
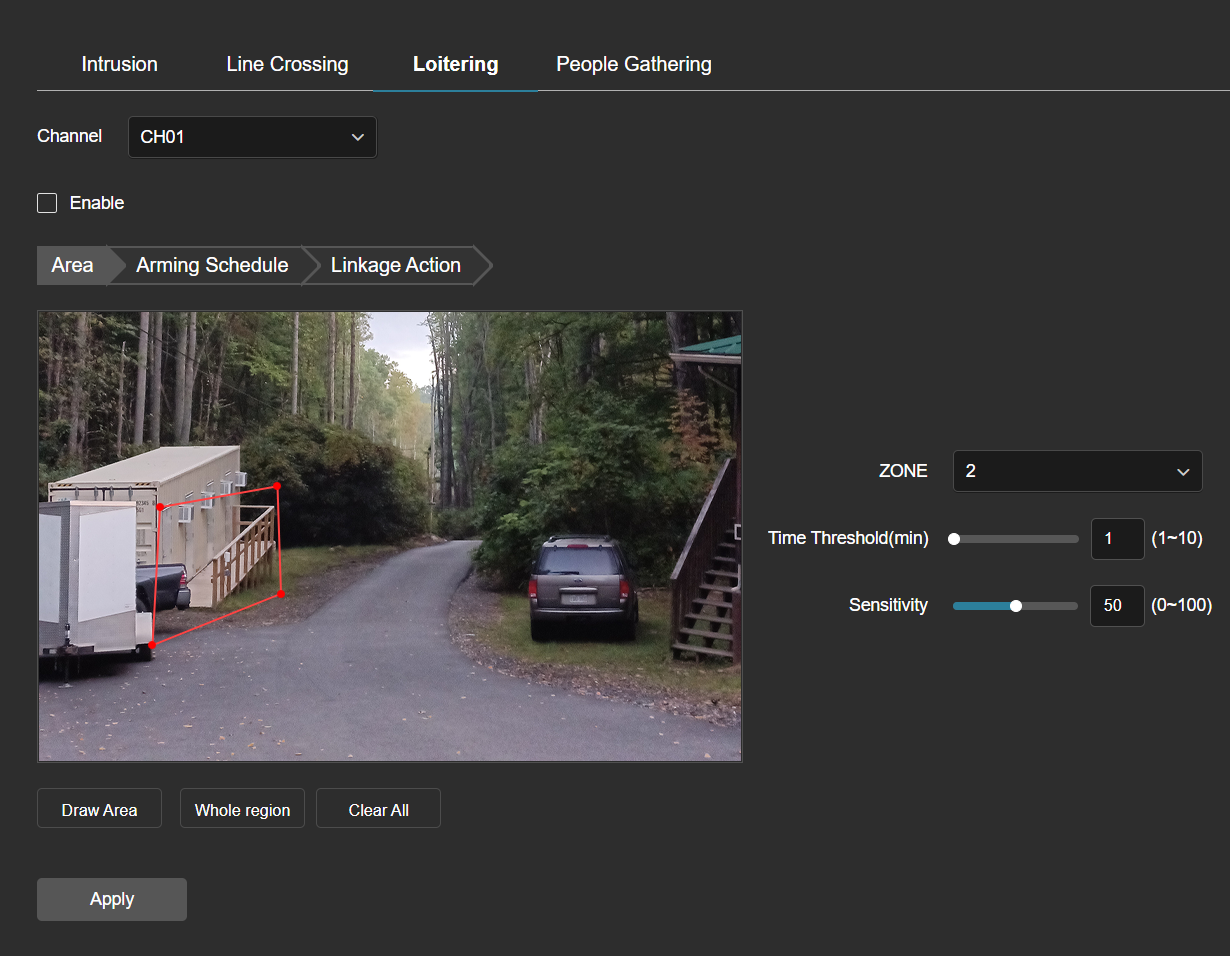
This looks for people remaining in an area that is typically transitory.
Area
To draw an area for analysis, select the zone to draw using the dropdown, then click Draw Area. Click four times in the image area to define a shape. Once it's drawn, you can click and drag in the center to move the shape, or click and drag a corner to adjust it. Whole region selects the entire sceeen, and Clear All removes all defined zones.
Set the threshold and sensitivity as needed.
Click Apply to save all changes.
Arming Schedule
Blue bars show when the channel has motion detection active; gray is inactive.
-
Click and drag in a gray area to add a new active section.
-
Click on a blue bar to open its data; enter the start and end times manually in the popup, or drag the dots at the ends of the bar to adjust.
-
Click the
icon to copy that day's schedule to other days.
Linkage Action
This configures which actions an alert triggers.
-
Normal Linkage
-
Pop-up Window:
-
Buzzer Alarm:
-
Send E-mail:
-
Channel Record:
-
Notify Surveillance Center
-
Upload to FTP
-
-
Alarm Output: Enable this to trigger a local alarm from the camera. Then enable the alarm output(s) to use.
-
PTZ Linkage
-
Linkage Channel: Select which PTZ camera to activate.
-
Preset: Select the preset that focuses on the area.
-
xx
People Gathering
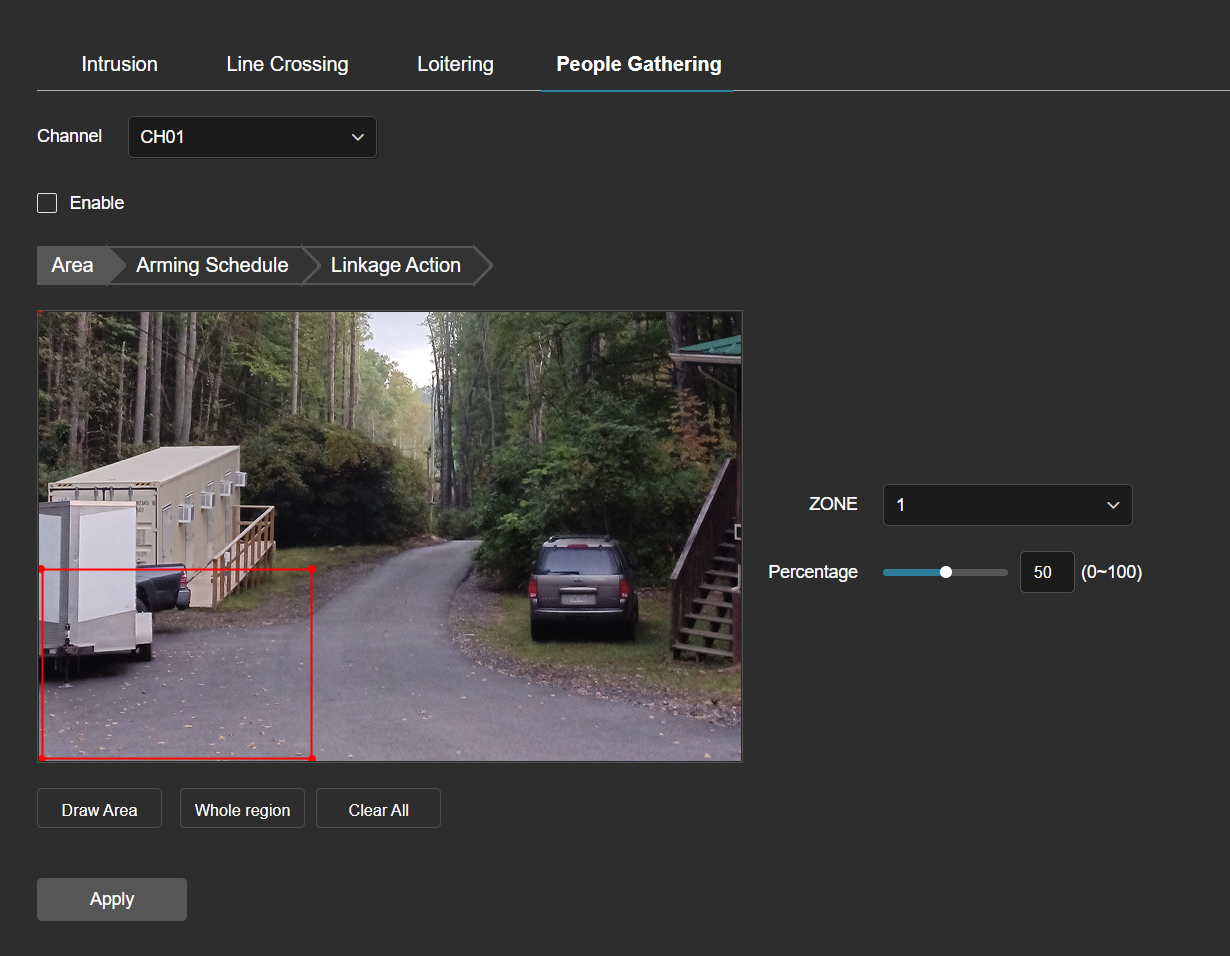
This looks for groups assembling in an area where such are not expected.
Area
To draw an area for analysis, select the zone to draw using the dropdown, then click Draw Area. Click four times in the image area to define a shape. Once it's drawn, you can click and drag in the center to move the shape, or click and drag a corner to adjust it. Whole region selects the entire sceeen, and Clear All removes all defined zones.
Set the percentage as needed.
Click Apply to save all changes.
Arming Schedule
Blue bars show when the channel has motion detection active; gray is inactive.
-
Click and drag in a gray area to add a new active section.
-
Click on a blue bar to open its data; enter the start and end times manually in the popup, or drag the dots at the ends of the bar to adjust.
-
Click the
icon to copy that day's schedule to other days.
Linkage Action
This configures which actions an alert triggers.
-
Normal Linkage
-
Pop-up Window:
-
Buzzer Alarm:
-
Send E-mail:
-
Channel Record:
-
Notify Surveillance Center
-
Upload to FTP
-
-
Alarm Output: Enable this to trigger a local alarm from the camera. Then enable the alarm output(s) to use.
-
PTZ Linkage
-
Linkage Channel: Select which PTZ camera to activate.
-
Preset: Select the preset that focuses on the area.
-
xx